Why should a painter learn how to make his/her own canvas stretcher?
1. He/she considers components of "quality" to be important to her work and practice.
Some artists care about the quality of the supplies they use to make art (paint, brushes, canvas and frames), and they refuse to rely on a sub-par commercial products for their work.
2. Artists are visionaries.
Artwork should not revolve around the supplies available, instead, artists needs to be a resource to make whatever they envision. Knowing how to build frames enables creators to go as small or large as they need - and it allows the canvas shape to be more innovative: square, triangle, rectangle, shaped ... the possibilities are endless!
3. Power tools are empowerment.
It feels good to look at a tool and say, "I can use that!" Being adept with power tools provides people with the power to make and fix whatever they need - in the studio or the home. This also frees the artist to explore other avenues - sculpture, installation, assemblage, etc.
A NOTE ABOUT SAFETY.
This site is meant to be a general aide to the formation of a canvas stretcher. The tools that I am using will be different than the tools the reader uses, so read the manuals to YOUR power tools. Specifically, learn where the safety switches and automatic turn off buttons are; study the upkeep and storage recommendations; and though I want you to feel confident using tools - never become unconcerned about them. It is important to always be alert and serious when using tools, no matter how proficient you become.
Carpenters all over the world abide by these rules:
1. Measure twice.
2. It is better to cut too large than two small.
3. Be picky and patient ... fiddle with it until it is perfect.
1. The project

We are using 1" x 2" cedar boards. We use cedar because it does not warp.
OTHER SUPPLIES INCLUDE:
nail gun/compressor
2" finish nails
1.5" nails
wood glue
elbow square
measure tape
pencil
chop saw (also called miter saw)
table saw
safety glasses
masonite (for edge supports and center squares)
planer
broom
patience
The first thing you need to do is get your frame and brace boards! Your hardware store will probably not carry long cedar 1" x 2"s, so you will need to make them. To do this, buy as many 1" x 8" as needed and "rip" the strips. This means you will cut 2" strips out of the 8" board. I will show you how to do this, but first I want you to be familiar with table saw safety -- see next blog to learn more!
2. Table saw safety
1. Wear short sleeves.
2. Tie hair back.
3. Pay attention, focus on keeping the wood firm against the "fence."
4. Main goal: to keep fingers out of the blade.
5. Wear safety glasses.
6. Have someone help you catch long boards.
To begin your project, see next blog.
3. Rip boards

1. Adjust blade so that there are no more than 1 - 3 "teeth" showing above the board you are going to cut. You want to cut board with the grain.
2. Measure from the inside of the blade and set the fence appropriately.
3. Stand to the side in case the wood kicks back.
4. Know where your safety switch is.
5. Turn on saw, push wood through the blade - keeping it tight against the fence.
6. If it is a long board, have someone stand on the other end to help guide (NOT pull) the wood through.
4. Angles needed

We will cut the braces later, so don't worry about them right now - just focus on the frame for now.
First, let's learn a little bit about miter saw safety in the next blog post.
5. Miter saw safety
1. Wear safety glasses.
2. Keep hands about 6" - 8" away from blade.
3. Keep wood firmly planted against back fence.
4. Put something under long piece of wood so it doesn't fall when it is cut.
5. Wait for saw to stop spinning after making the cut and before lifting it back up.
6. Unplug all tools when not using them.
6. Miter end of first board - avoiding knots

Note the knot at the end of this board. Since we have some extra length, we will make our first cut past the knot.
7. Mark angles for miter cuts


Turn the angle on the miter saw, and cut to size. Generally you want to cut on the line - or a little on the outer edge of the line (see below). Remember: ALWAYS ERR ON THE SIDE OF TOO BIG than too small!!!

8. Mark length for next board

After you cut the angle, put it on the floor.
Make sure the cut end of the two boards are flush.
Mark a line showing where the finished board ends.
Like last time, also mark the angle you need on the side of the board.

Cut to size, just like you did in the previous post.
9. Double check your work

Once one pair is finished, do the exact same thing for the other side of the frame. Repeat blogs 6 - 9. After this, you should have the frame cut. In our case, we have 2 6' boards and 2 4' boards with angles on all ends.
10. Plane the inner edge of main frame

Mark the inside edge.
Take a planer to the inside edge of the frame on all four boards. You can use an electric planer like above, or a manual planer (which is safer).

11. Nail the frame together.

First we need to prepare the nail gun and let the compressor warm up.
12. The compressor

13. Close the hose valve

14. Attach hose fitting
Now it is time to attach the hose fitting. To do this, simple push back on the metal part at the top of the hose and push tube into the setting - allowing the metal part to spring back over the tube.

15. Plug in and turn on compressor
16. Prep the nail gun

17. Load nail gun


To load gun, slide in nails from the bottom slot (see middle photo).
The slider will stop at the end of the nails (see bottom photo) - it serves to catch the nails and puts enough pressure on them to push the nails into the shooting chamber when ready.
18. Set compressor


19. Attach hose to nail gun

Note #1: it might be easier to attach the gun before you turn on the air, so you are not fighting with the pressure - but it doesn't matter.
Note #2: the gun will not "shoot" nails until the end of it is pushing against something. This is a safety feature.
20. Nail outer frame together


To use the gun, all you do is:
1. Place
2. Push
3. Pull the trigger.
Before placing the gun, secure the boards under your knees. Be picky about getting the corners flush together, and weird spacing will result in a crooked frame.
Use two nails on one side, and one nail on the other.
Wipe away excess glue.
21. Find center for long board placement

For this project, I will begin with the long center brace.
To do: Measure side and mark center point (see photo).
22. Measure for long brace placement


Notice how he is measuring the board - not with a measuring tape, but with the frame itself.
To do:
1. place center brace at center mark on the frame. Have one end touching the floor and bring it up to the edge of the other end and MARK with a pencil. REMEMBER: it is better to cut too LONG rather than too short!
2. Cut your board with the miter saw at the mark - set the saw at the center setting and just cut straight down - NO ANGLES are needed!
3. Bring cut board over to the frame and see if it fits. Your goal is to have the center of the brace hit the center line of the frame (see bottom photo). This fit should be snug, but not too snug. You may need to cut the board a few times to get it right - no worries, just be patient.
23. Measure short braces

Again, you may need to make only one if you have a smaller frame.
To do this, place your board flush at one end, near the corner of the frame and mark where your next cut will be at the other end.
NOTE: If you were to measure this mid brace where you will be placing it (two feet in on each side), then you are apt to get a faulty measurement, because we have not squared the frame yet, and the area might be bowed out.
24. Check length then lay out frame


Now mark where your mid brace/s will go. Again - we have two mid braces, you may only have one. If you only have one, find the center and make a mark. We are putting ours two feet in on both sides.
25. Gotta make this flush!

26. Mark dado marks and cuts

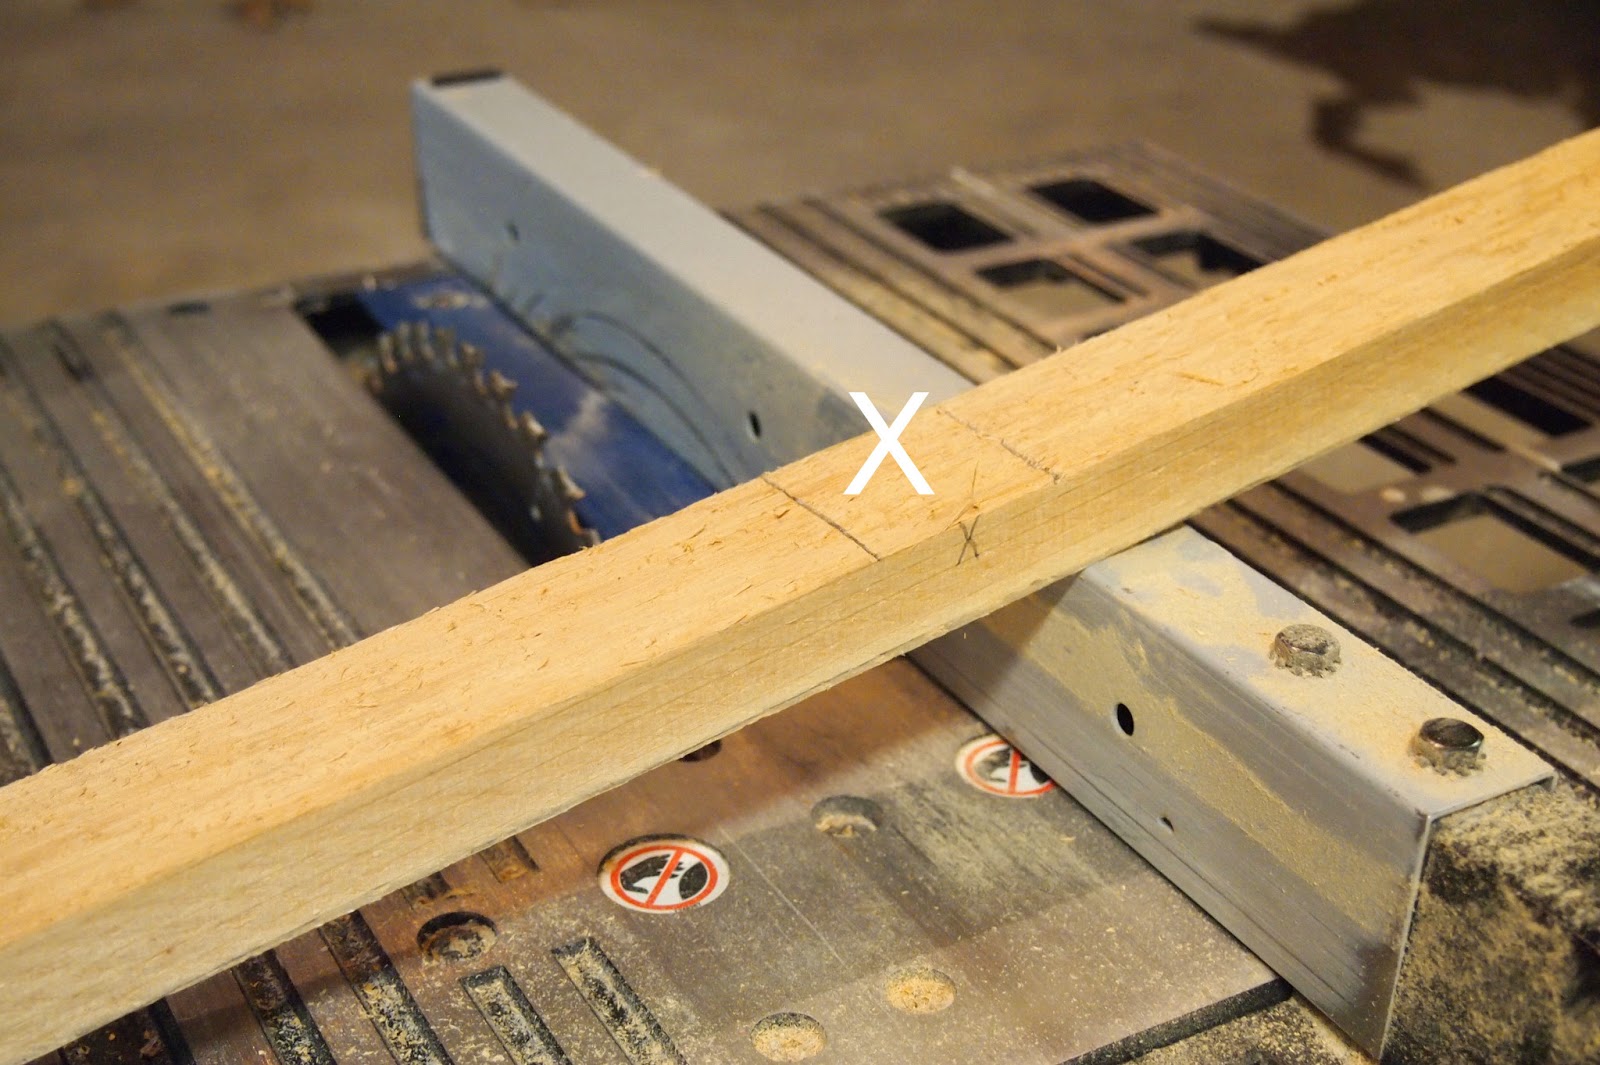
To make the grooves necessary to flush the braces, we need to mark out our cuts. So center your braces, and mark on each side where the boards meet. (See above).

In the above photo, you can see the line we just marked on this bottom board. Notice the top board - there are two more lines and an X. The X tells us where to cut, and the lines show us how wide and deep to cut. We are going to make a groove (dado) that is 1/2 as thick as the board.
Before taking boards over to the saw, mark the boards so you remind yourself how to put things back together. Notice below, I put an "L" on the board for a reminder (see below).


28. Dado the boards


These photos show you how the groove is growing. Top photo show the push out - bottom shows a pull back. I probably had to do this a dozen times or so.
NOTE: I REALLY REALLY should have on safety glasses! I could feel the sawdust in my eyes and it wasn't pleasant!

30. Check fit


34. Use square before attaching middle braces


35. Re-check square

CLICK ON THE "Older Posts" link to see more steps -------------------------------------> (below here).
Subscribe to:
Comments (Atom)